


Want to boost your Instagram engagement and get discovered by more local customers? Adding a location tag is one of the easiest ways to expand your reach. Whether you are sharing a picture on your feed, posting a daily story, or setting up a permanent address for your business, tagging your location connects you directly to the right audience. In this complete guide, Good Review Service will show you exactly how to add a location on Instagram for posts, stories, and business profiles step-by-step.
Why Instagram Location Tags Matter
-
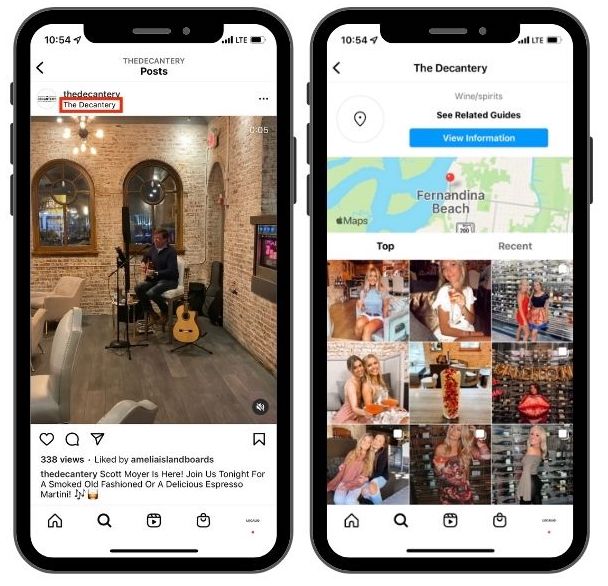
Boost Local Discoverability: Tagging your location places your content directly into that region’s public search feed. This makes it incredibly easy for local customers who are exploring your area to naturally stumble upon your profile.
-
Increase Post Engagement: Posts and stories that include a specific geographic tag consistently receive significantly higher engagement compared to those left un-geotagged.
-
Build Consumer Trust: Displaying a clear, physical location or verifiable storefront address signals authenticity, letting potential clients know you are a legitimate, operational business they can visit in the real world.
-
Drive Targeted Foot Traffic: For brick-and-mortar storefronts, location tags serve as an interactive digital map. Users can tap the tag to instantly get directions, read local reviews, or plan their next physical visit.
How to Add a Location on Instagram Posts
Before You Post
To give your new content maximum local reach right from the start, add a geotag during the standard creation process. Follow these simple steps:
-
Open Instagram and tap the “+” icon at the bottom or top of your screen to create a new post.
-
Select your photo or video from your camera roll and tap Next.
-
Edit your post if desired by applying filters or adjusting settings, then tap Next again.
-
On the final sharing screen, tap Add Location located right below the caption section.
-
Search for a place, business, landmark, or city by typing the name into the search bar.
-
Select the correct location from the populated results list.
-
Tap Share. Your post will go live, and the clickable location tag will appear directly above your image or video.
Add a Location After Posting
If you forgot to tag your location before hitting publish, you don’t need to delete your post. You can easily add or update a geotag after it’s already live:
-
Open the post on your profile grid that you want to update.
-
Tap the ⋯ (three dots) located in the top-right corner of the post.
-
Select Edit from the pop-up menu to open the modification screen.
-
Tap Add Location (if it doesn’t have one yet) or tap the existing location name if you want to change it.
-
Search for and select your preferred location from the search bar.
-
Tap Done (✓) in the top-right corner to save your changes and update your live post.
How to Add a Location on Instagram Stories
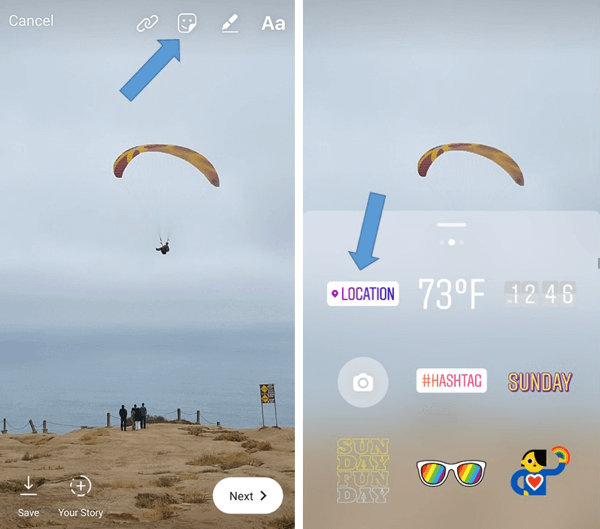
Method 1: Use the Location Sticker
The most common and visually appealing way to add a geotag to your story is by using the interactive sticker tool. Follow these simple steps:
-
Open Instagram and swipe right from your main feed, or tap Your Story in the top-left corner to open the camera.
-
Take a photo/video using the built-in camera, or swipe up to upload one from your gallery.
-
Tap the Sticker icon (the square smiley face icon located at the top of your screen).
-
Select the Location sticker from the grid of options.
-
Search for a place, business, landmark, or city by typing the name into the search bar.
-
Tap the location you want from the results list to add it to your screen.
-
Resize or move the sticker anywhere on your Story by pinching it with two fingers and dragging it. You can also tap the sticker itself to change its color scheme.
-
Share the Story to your public story or your Close Friends list.
Method 2: Tag a Location Without the Sticker
If you want to keep your Story’s design minimalist without a large sticker blocking your image, you can embed a location directly within the text tool.
-
Create your Story by shooting or uploading your media.
-
Tap the text (Aa) tool in the top-right corner to open the keyboard.
-
Type the location name (or use the “@” symbol followed by the location name in some app updates).
-
Select the matching location tag from the suggestion bar that appears right above your keyboard.
-
Post the Story as normal. The text will now function as a live, clickable geotag.
How to Add a Location to Your Instagram Bio
Option 1: Add Your Location in Your Bio Text
The quickest way to let profile visitors know where you are based is to insert your location details directly into your standard bio description. This method is available for all account types, including personal accounts:
-
Go to your Instagram profile by tapping your profile icon in the bottom-right corner.
-
Tap Edit Profile located right below your bio statistics.
-
In the Bio field, type your city, country, or location emoji (such as the 📍 pin emoji) alongside your descriptive text.
-
Tap Done (or the checkmark icon) in the top-right corner to save and publish your updates.
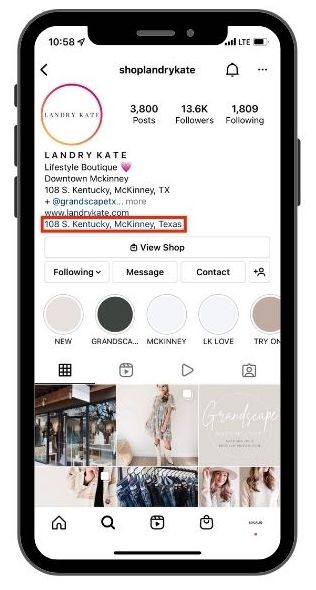
Option 2: Add a Business Address (Professional Accounts)
If you manage a business, creator, or professional profile, Instagram allows you to create a dedicated, clickable map link. This separates your physical address from your limited bio character count:
-
Go to your profile and tap the Edit Profile button.
-
Scroll down to the public business information section and select Contact Options (or Profile Display depending on your app version).
-
Tap on Business Address and enter your specific street address, city, and zip code.
-
Toggle the option to Display contact info to choose whether to display it publicly on your profile.
-
Save your changes. This creates a distinct, clickable link on your profile that opens directly into map applications when tapped by users.
Option 3: Mention Your Location with a Link
If you prefer not to display a precise street address but still want to guide users to a local directory or map, you can utilize the external link feature:
-
Copy a direct link to your location from Google Maps, Apple Maps, or a “link-in-bio” landing page (like Linktree) that hosts your regional contact information.
-
Go to Edit Profile on Instagram and select Links.
-
Tap Add external link, paste your URL, and assign a clear title such as “Our Location Map” or “Visit Our Office.”
How to Create a New Location on Instagram
Method 1: Create a New Place on Facebook
Because Instagram shares Meta’s global location database, creating a custom geotag requires using the Facebook mobile application first. Follow these steps to register a new location:
-
Open the Facebook app on your iOS or Android mobile device.
-
Start creating a new post by tapping the “What’s on your mind?” status bar.
-
Scroll down the post options and tap Check In (or the Location pin icon).
-
Search for your specific place name in the search bar.
-
If it doesn’t exist, look for an option such as Add a New Place at the bottom of the results.
-
Enter the required details:
-
Place name: The exact public title you want displayed.
-
Category: Choose a matching business category, landmark, or public venue type.
-
Address or map location: Provide a precise physical street address or drop a pin on the map.
-
-
Save the new place and publish the placeholder post.
Note: After Meta processes the location, it may become available on Instagram, though this verification can take some time and isn’t guaranteed.
Method 2: Set Up a Business Location
If you are trying to establish a permanent geographic marker for an official storefront or physical company, utilizing professional account resources yields the most reliable results:
-
Create or claim your business presence using Meta Business Suite or Meta’s core business tools.
-
Ensure your business address is completely accurate and set to be publicly available on your connected profile pages.
-
Use the location frequently in active Facebook posts and customer check-ins to build geographic data volume.
-
Search for the location on Instagram after it has been properly indexed by Meta’s mapping servers.
If “Add a New Place” Doesn’t Appear
Meta occasionally updates, rotates, or restricts custom location creation features to protect platform data integrity. If you cannot find the prompt to add a new location, apply these troubleshooting steps:
-
Check location permissions: Make sure high-accuracy location services (GPS) are fully enabled for the Facebook app within your mobile device settings.
-
Use native apps: Try creating the custom place exclusively from the official Facebook mobile application rather than a desktop or mobile internet browser.
-
Account health: Verify that your Facebook account is fully verified, authentic, and in good standing with Meta’s community standards.
Important Notes
-
No instant guarantee: Creating a brand new location on Facebook does not guarantee it will immediately synchronize or appear within Instagram’s sticker or post tagging systems.
-
Platform cleanup: Duplicate, misspelled, misleading, or intentionally fake locations may be flagged and permanently removed by Meta moderators.
-
Longevity: Verified business locations are significantly more likely to persist and remain searchable on Instagram than unofficial, custom personal landmarks.
Common Problems With Instagram Locations
Fixing Instagram Location Search Issues
-
Enable Precise GPS Permissions: If Instagram cannot find any local places, ensure that your mobile device has location services turned on and set to “High Accuracy” or “Precise Location” specifically for the Instagram app.
-
Clear App Cache: A cluttered system cache can stall search features. Clear your Instagram app cache (or offload and reinstall the app on iOS) to refresh map connectivity.
-
Check Meta’s Server Status: Sometimes, location databases experience temporary outages. If a highly popular spot suddenly disappears from search results, wait a few hours for Meta to fix internal indexing issues.
Problems With Business Address Syncing
-
Disconnect and Reconnect Facebook: If your business address shows up on Facebook but fails to sync with Instagram, navigate to your account center, disconnect the pages, and re-link them to force a hard data sync.
-
Match Profiles Exactly: Ensure that your Instagram profile is fully converted to a Professional or Business account, and that your company name and category match your Facebook Page exactly.
-
Verify Address Format: Meta’s system can reject incomplete addresses. Double-check that your street number, city, and postal code are entered correctly into the designated fields rather than typed casually in the bio box.
Location Tags Missing From Stories or Posts
-
Update Your App Version: If the Location sticker is completely missing from your Story tray or you cannot find the “Add Location” line on posts, check your device’s app store to ensure you are running the newest version of Instagram.
-
Account-Specific Feature Delays: Meta rolls out updates in phases. If you recently switched your account type or region, some interactive geotagging features may take up to a few days to fully activate on your dashboard.
-
Resolve Shadow Restrictions: If your location tags suddenly stop generating views or fail to attach to public feeds, your account may be temporarily flagged for spamming tags. Take a short break from heavy tagging to restore normal post distribution.
Learn more: Instagram ads for nail tech local
Final Thoughts
Implementing a highly precise, consistent approach to your geographic data tagging is one of the most effective ways to expand your organic visibility, eliminate conversion friction, and claim your local market share. Your social media profiles should never be treated as static photo albums; they must operate as a highly responsive, location-mapped front door that guides users straight to your physical shop.
Focus your organization’s daily energy on delivering elite, high-quality service and memorable experiences within your local facilities. By partnering with the reputation-management specialists at Good Review Service to capture, verify, and scale your real-world customer validation across the web, your business channels will remain consistently filled with high-intent patrons ready to support your brand.