


Adding a geotag to your Facebook content is one of the fastest ways to expand your local reach and connect with nearby audiences. Whether you are publishing a standard update, updating your business profile, or sharing a temporary moment, location tagging is essential. In this guide, Good Review Service will show you exactly how to add a location on Facebook posts, stories, and pages step-by-step.
Why Facebook Location Tags Matter
-
Expand Organic Local Reach: When you add a location tag to your posts or stories, Facebook indexes your content geographically. This allows users exploring that specific area, neighborhood, or city to organically discover your page.
-
Build Instant Brand Trust: Displaying a clear, verifiable location or physical check-in signals to your audience that you are a legitimate, real-world operation rather than a faceless online profile.
-
Drive In-Store Foot Traffic: For brick-and-mortar storefronts, a location tag functions as a direct digital map. Users can simply click the tag to instantly get driving directions, view your business hours, or read local customer reviews.
-
Boost Content Engagement: Posts and stories that specify a location see significantly higher engagement rates. Audiences are naturally more inclined to comment, share, and interact with content that feels locally relevant to their community.
How to Add a Location to a Facebook Post
Before Posting
To ensure your new update reaches local feeds right from the moment it goes live, you should attach a geotag during the initial creation process. Follow these straightforward steps:
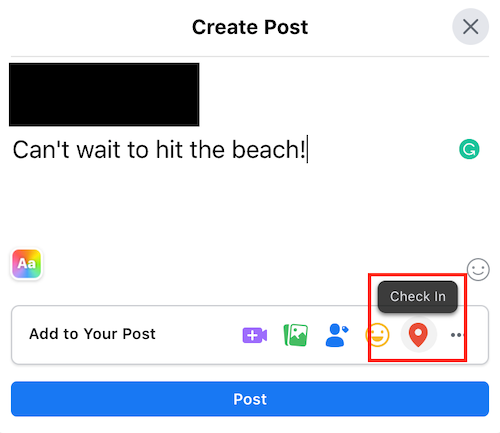
- Open Facebook and tap What’s on your mind?
- Create your post (text, photos, videos, etc.).
- Tap Check In or Location (the name may vary by device).
- Search for a place, business, landmark, or city.
- Select the location from the list.
- Finish your post and tap Post.
Add a Location to an Existing Post
If you have already published a status update or uploaded a photo album but forgot to add a geotag, you can update it at any time using Facebook’s post-editing tools:
- Open the post.
- Tap the ⋯ (three dots) menu.
- Select Edit Post.
- Tap Check In or the location field.
- Choose a location.
- Save your changes.
If You Can’t Find the Location
If a specific business, store, or landmark fails to appear when you type it into the Facebook search bar, apply these rapid troubleshooting steps:
-
Verify GPS permissions: Check your smartphone’s system settings to make sure location services are fully enabled and set to high accuracy for the Facebook mobile app.
-
Expand your search terms: Try searching for the location by using its exact physical street address or a highly prominent nearby landmark instead of just the business name.
-
Register a new location: If the address genuinely does not exist in Meta’s mapping database, you will need to utilize Facebook’s custom “Add a New Place” feature within the check-in system to create the landmark from scratch before it becomes searchable.
How to Add a Location to Facebook Stories
Using the Location Sticker
Adding a geotag to your Facebook Story makes your content more interactive and allows viewers to see exactly where you are. Follow these simple steps to add a location sticker:
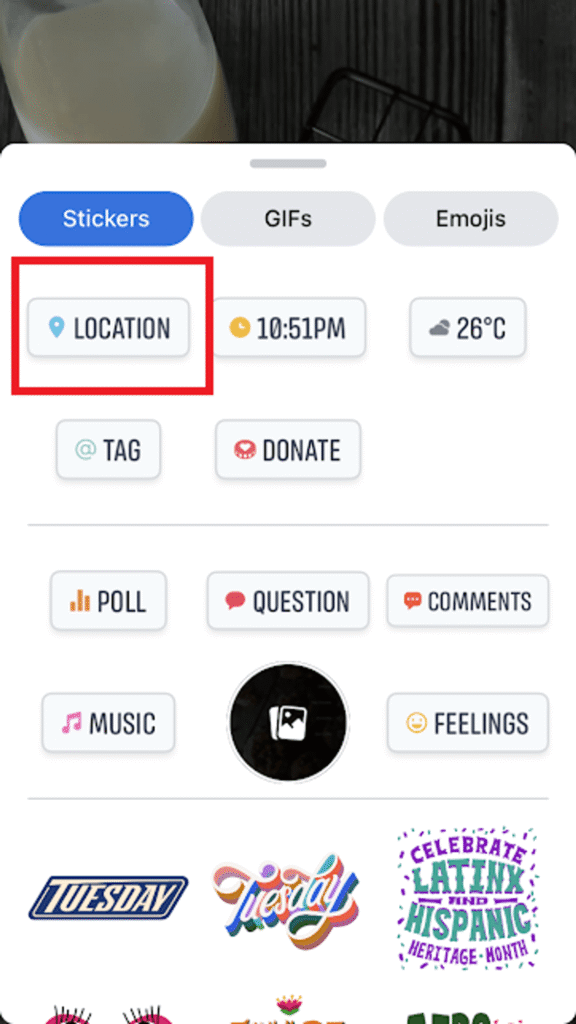
- Open Facebook and tap Create Story.
- Take a photo/video or upload one from your device.
- Tap the Stickers icon (usually a smiley face).
- Select Location.
- Search for a place, business, landmark, or city.
- Tap the location you want to use.
- Move, resize, or rotate the location sticker on your Story.
- Tap Share to Story.
If You Don’t See the Location Sticker
If the location tool is missing from your stickers dashboard, it is typically caused by outdated software or restricted app privacy settings. Use these troubleshooting steps to resolve the issue:
-
Update your application: Check your device’s App Store or Google Play Store to ensure you have updated Facebook to the latest version.
-
Enable system location permissions: Ensure that Facebook has permission to access your device’s GPS hardware by navigating through these settings:
-
iPhone: Go to Settings → Privacy & Security → Location Services → Facebook (set to “While Using the App”).
-
Android: Go to Settings → Apps → Facebook → Permissions → Location (set to “Allow only while using the app”).
-
-
Restart the app: Force-close the Facebook application completely, reopen it, and try creating your story again.
Tips
-
Get Creative with Design: You can easily combine your location stickers with custom text fonts, animated GIFs, interactive polls, music tags, and other creative Story features to maximize engagement.
-
Boost Visibility: Adding a location tag does more than just help viewers instantly understand where the Story was created; it can also significantly improve your discoverability across Meta’s location-based discovery feeds.
How to Add a Location to a Facebook Business Page
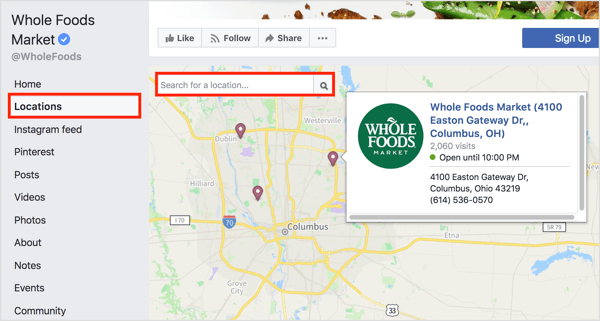
Locking down a permanent, clickable address inside your primary brand description dashboard is a critical step to ensure your business displays correctly in local map packs and proximity searches.
On the Facebook App
- Open Facebook and switch to your business Page.
- Go to your Page and tap Edit Page (or Page Settings).
- Select Page Info.
- Find Location or Address.
- Enter:
- Street address
- City
- State/Province
- ZIP/Postal code
- Country
- Save your changes.
On Desktop
- Open your Facebook Business Page.
- Click Manage Page or Settings.
- Go to Page Info.
- Under Location, enter your business address.
- Save the changes.
Optional Settings
- Show a map on your Page.
- Hide the exact street address if you only want to display the city or service area.
- Add business hours and contact information alongside your location.
How to Create a New Facebook Location
Create a New Facebook Location
- Open the Facebook app.
- Start creating a new post.
- Tap Check In or Feeling/Activity → Check In.
- Search for the location name you want to use.
- If it isn’t found, look for Add a New Place (availability varies by region and account).
- Enter the details:
- Place name
- Category (e.g., Restaurant, Store, Landmark)
- Address or map location
- Save the new place.
Once approved and indexed by Meta, the location may become available for:
- Facebook posts
- Facebook Stories
- Facebook check-ins
- Instagram location tags
If “Add a New Place” Is Missing
Meta has changed this feature over time, and it may not be available to all users. In that case:
- Ensure location services are enabled on your device.
- Try creating the place from the Facebook mobile app.
- Create or update a business presence through Meta’s business tools if the location represents a business.
Tips
- Use the official business name and accurate address.
- Avoid creating duplicate locations, as Meta may merge or remove them.
- New locations can take time to appear in search results across Facebook and Instagram.
How to Add a Location on Facebook to Sync With Instagram
If You Want a Location Available on Both Facebook and Instagram
- Create or verify the location on Facebook:
- Open Facebook.
- Create a post and tap Check In.
- Search for the location.
- If available, use Add a New Place to create it.
- Use the location on Facebook posts or check-ins.
- Wait for Meta to process and index the location. This can take anywhere from a few hours to several days.
- Open Instagram and:
- Create a post, Story, or Reel.
- Tap Add Location.
- Search for the same location name.
If the location has been added to Meta’s database, it should appear in Instagram’s location search.
For Businesses
If the location represents a business, make sure your Facebook Page has:
- A complete address
- Accurate business information
- A visible location on the Page
This can improve the chances that the location appears across Meta platforms.
If the Location Doesn’t Show Up on Instagram
- Wait a little longer for synchronization.
- Check that the location name and address are correct.
- Update both Facebook and Instagram to the latest versions.
- Try searching with different variations of the location name.
Learn more: How to Remove a Facebook Page in 2026
Common Facebook Location Problems and Fixes
Why Facebook Cannot Find Your Location
-
Outdated App Database: If a newly established business or landmark isn’t showing up, Facebook’s mapping system may not have updated its local directory database yet.
-
Incorrect Spelling or Syntax: Facebook’s search mechanism is highly specific. Typing an address slightly differently from how it is listed officially can cause the search results to return empty.
-
Network Connectivity Issues: A weak cellular data signal or unstable Wi-Fi connection can temporarily block the Facebook app from communicating with Meta’s live global positioning servers.
Fixing GPS and Device Permission Issues
-
Turn on Precise Location: If your device is set to “Approximate Location,” Facebook will struggle to find nearby places. Go to your smartphone’s privacy settings and enable “Precise Location” or “High Accuracy” mode.
-
Grant App Permissions: Ensure that Facebook has active system permissions to access your GPS hardware. Toggle the setting to “Allow while using the app” on either iOS or Android.
-
Refresh Location Services: If the app freezes or fails to detect your movement, try toggling your phone’s Airplane Mode on and off, or restart your location services completely to force a hardware refresh.
Why Some Business Locations Disappear
-
Page Category Changes: If a business page alters its category from a “Local Business” to an abstract category (like “Product/Service” or “Website”), Meta may automatically strip away its public map marker and physical location properties.
-
Merged or Duplicate Profiles: When multiple Facebook pages for the same venue are merged together, temporary indexing glitches can cause the location tag to drop out of search feeds for several days.
-
Policy Violations: Meta systematically removes location tags that receive spam complaints or are flagged as fraudulent, unverified, or violating community guidelines.
Troubleshooting Check-In Errors
-
Verify “Check-In” Settings: For business page owners, ensure that the “Allow people to check in” checkbox is enabled under your page’s structural settings; otherwise, users cannot tag your storefront.
-
Clear Facebook App Cache: Accumulated system corruption inside your mobile app can block checkout and check-in popups. Clear the app data or offload the app to restore normal posting functions.
-
Log Out and Log Back In: If you encounter a persistent error message when trying to attach a location to a post or story, logging completely out of your Facebook session and logging back in can instantly reset the broken API loop.
Learn more: How to Delete a Review from Facebook
Final Thoughts
Implementing a highly precise, consistent approach to your geographic data tagging is one of the most effective ways to expand your organic visibility, eliminate conversion friction, and claim your local market share. Your social media profiles should never be treated as static photo albums; they must operate as a highly responsive, location-mapped front door that guides users straight to your physical shop.
Focus your organization’s daily energy on delivering elite, high-quality service and memorable experiences within your local facilities. By partnering with the reputation-management specialists at Good Review Service to capture, verify, and scale your real-world customer validation across the web, your business channels will remain consistently filled with high-intent patrons ready to support your brand.